
Safety & Instructions
DO NOT USE THE KUPPER MOUNT SYSTEM UNTIL YOU READ THE SPECIFICATIONS AND IMPORTANT SAFETY INSTRUCTIONS
With all Kupper Mounts’ vacuum mounts fully engaged , the rack will securely hold bicycles up to 45 pounds each at speeds of no more than 75 mph. The system will indicate if the Kupper Mounts are not maintaining vacuum: each Kupper Mounts has a safety ring in the pump that will extend out and become visible upon loss of vacuum. If you see the safety indicator ring, you must re-pump the Kupper Mounts before the system can be safely used again.
Your Responsibility
You must inspect the safety rings on all Kupper Mounts when entering and exiting your vehicle. A quick glance will tell you if the system is at full power. If the safety ring is visible, you must re-pump the Kupper Mounts before the system can be used. If any of your Kupper Mounts do not hold vacuum for at least 2 hours, they may need to be cleaned, repaired, or replaced.
WARNING
-
Do not exceed the posted speed limit.
-
Do not use if the indicator band is exposed on any of your Kupper Mounts’ pumps.
-
Do not use if all of your rack's vacuum cups cannot maintain a full vacuum seal for at least 2 hours at a time.
-
Check the indicator band during use.
-
Clean the mounting surface before attaching.
-
Clean Kupper Mounts before attaching.
-
Clean and lube your Kupper Mounts' pumps regularly.
-
Store in protective case when not in use.
-
Make sure the vacuum pads are fully seated in the protective case when not in use.
-
Inspect screws, nuts, and bolts regularly and retighten if necessary.
-
Do not use for bicycles over 45 pounds.
-
Make sure the fork mount is fully clamped and secure before you transport your bicycle.
-
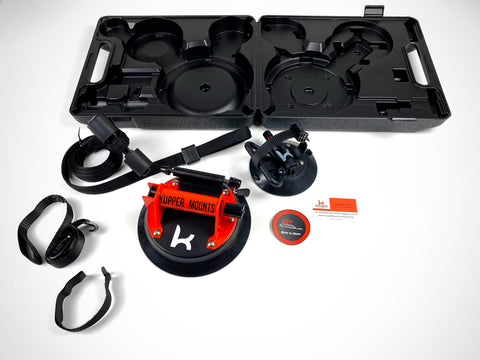
Front Kupper Mount
-
Rear Kupper Mount
-
Security Tether
-
Cam-Buckle Strap
-
Peddle-Stay Velcro Strap
-
All-in-One Carrying Case
The Kupper Mounts Bike Carrier Systems are designed to attach to a vehicle’s roof top or the back glass.
-
DO NOT mount bicycles with the handle bars facing the rear of the vehicle.
-
DO NOT mount bicycles sideways.
-
DO NOT mount bicycle on side of vehicle.
-
For roof mounting, position the rack near the front or back windshield corners where the roof has more internal support. The metal in the middle of some car roofs may not be sturdy enough to support the weight of your bicycle and rack.
-
For rear window mounting, make sure the bicycle's rear wheel does not hang lower than the bottom of the vehicle's bumper.
EASY 3-STEP ATTACHMENT

Kupper Mounts Bike Racks are one of the safest, most affordable, easy-to-install in less than 2-minutes and remove in 10-seconds, quick-to-store in the trunk...
Removing the front and rear Kupper Mounts is easy. For the front cup simply press the valve release button and pull. For the rear cup pull on the tab and lip together to release the vacuum pressure.
The following video explains how and when to use the provided cinch strap in place of the rear cup.
Quick Product Specs
-
System weighs just 4 pounds
-
Rated to hold bicycles up to 45 pounds
-
Front Kupper Mount needs only 10” of surface to be mounted
-
Rear Kupper Mount needs only 7” of surface to be mounted
-
Elevations up to 5000 feet.
-
Operates in temperatures from 10° to 120° Fahrenheit [-12° to 49° Celsius]
IMPORTANT SAFETY SPECIFICATIONS
-
The Kupper Mount System only weighs a total of 4 pounds, allowing you to easily carry it with you on a ride, while also being small enough to be taken with you on a plane.
a. Front Kupper Mount measures 9” nominal diameter, weighing just 3 pounds.
b. Rear Kupper Mount measures 6” nominal diameter, weighing just 1 pound.
-
The Kupper Mount will securely hold bicycles up to 45 pounds with speeds of not more than 75 mph.*
a. * Maximum Load Capacity requires the following:
i. Attachment on clean, smooth, nonporous surface.
ii. A minimum vacuum level of 17.5” Hg [-59 kPa]
iii. Rating is based on tests of new Kupper Mounts attached to the horizontal surface of a vehicle in ideal conditions.
-
Environmental Conditions
a. Kupper Mounts must be used on clean, smooth, nonporous surfaces
b. Rated for temperatures from 10° to 120° Fahrenheit [-12° to 49° Celsius]
c. The red safety rings may not perform reliably at elevations above 5000 feet.
d. It is recommended to store your rack at room temperature prior to use.
-
The Kupper Mount is a 9mm fork mount system. A thru-axle adapter can be used for bicycles with thru-axle front wheels. We know that the RockyMounts Driveshaft Thru-axle Bike Rack Adapter works well with the Kupper Mount System. You can purchase them at many bicycle retailers andonline.
DO NOT Use The Kupper Mount If It Is Visibly Damaged!!
Every time you use the Kupper Mount, YOU MUST first check to see if there are any cracks in the rubber cup, if the rubber cup is separating from the metal, or if there is any other obvious damage to the bike rack system.
DO NOT Use The Kupper Mount If You Can See The Red Safety Rings!!
Once you have installed the Kupper Mount System, if you can see the red safety rings then the system is not securely sealed to your vehicle. Both the Front and Rear Kupper Mounts have a red safety ring on the pumps. If you see the red safety ring on either Kupper Mount, then simply re-pump the Kupper Mount until it is no longer visible.
Important Note: If the red safety rings become visible within 3 hrs of installation, then the Kupper Mount is not holding a proper vacuum seal. The most likely cause is that the surface of the vehicle and/or the cup of the Kupper Mount are dirty and must be cleaned. Simply remove the Kupper Mount, clean the surface of the car and cup of the Kupper Mount. Then re-mount the Kupper Mount. After cleaning vehicle and Kupper Mounts, if the Kupper Mount still does not hold a vacuum seal for at least 3 hours, then the Kupper Mount may need to be repaired or replaced.
Check The Red Safety Rings Often!!
YOU MUST check and make sure that the red safety rings are not visible EVERY TIME that you get in and out of your vehicle. The red safety rings are easy to see and should only take a few seconds to inspect. If you do see the red safety rings then follow the safety instructions above.
Always Use The Security Tether!!
The Security Tether was designed to prevent the theft of your bicycle, but it can also prevent your bicycle from hitting traffic behind you in case of complete vacuum seal failure.
Always Remove The Kupper Mount And Store It In The Case!!
The Kupper Mount is not engineered to remain permanently on your vehicle. When not transporting a bicycle, place the Kupper Mount in the carrying case. The case is designed to prevent damage to the Kupper Mount.